New from Autodesk Blog Learning is and overview of how to use blocks in AutoCAD 2022. Be sure to check it out by clicking on the link below… How to Work With Blocks in AutoCAD If you have any questions about using blocks in AutoCAD, or AutoCAD LT, please send me a note. Regards, Kevin
Arch Blocks Blog
AutoCAD
New from Autodesk Blog Learning is and overview of how to use blocks in AutoCAD 2022. Be sure to check it out by clicking on the link below…

If you have any questions about using blocks in AutoCAD, or AutoCAD LT, please send me a note.
Regards, Kevin

What’s New in AutoCAD 2020
Here is a great article on whats new in AutoCAD 2020 from Edwin Prakoso at CADNOTES.com Click on the link below… https://www.cad-notes.com/autocad-2020-whats-new/ Have a great day! Kevin
How to Install the 100+ Hatch Patterns in AutoCAD 2018
Installing the 100+ Hatch Patterns product in AutoCAD has never been easier!
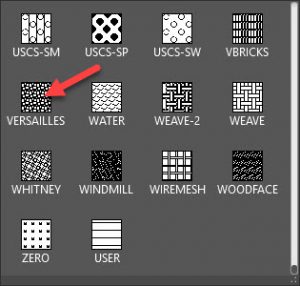
The hatch patterns and the previews integrate seamlessly into AutoCAD’s pop down Hatch menu. Below is a screen shot of the AutoCAD 2018 Hatch command pop down menu previewing the 100+ hatch pattern called Versailles:

Inserting the 100+ hatch patterns into your AutoCAD drawing is very easy. All you do is enter the Hatch command, select a pattern from the drop down menu, then pick an internal point (boundary area) that you want to place the pattern, then hit the enter key and you’re done!
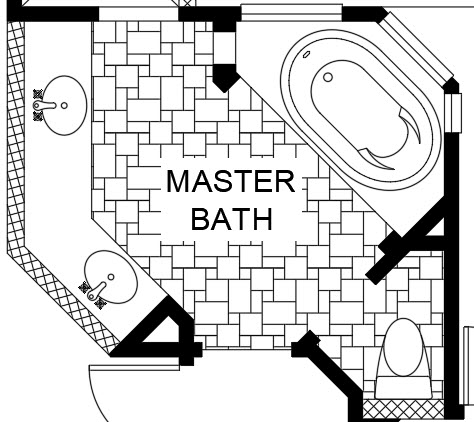
Below is the Versailles hatch pattern placed in a master bath floor plan:

Please click on the link below to see the hatch pattern installation detailed instructions:
If you have any questions, Please send Kevin an email by clicking on the Contact link below:
AutoCAD 2018 100+ Hatch Patterns Installation Instructions
How to Install the 100+ Hatch Patterns in AutoCAD 2018 Installing the 100+ Hatch Patterns product in AutoCAD has never been easier! The hatch patterns and the previews integrate seamlessly into AutoCAD’s pop down Hatch menu. Below is a screen shot of the AutoCAD 2018 Hatch command pop down menu previewing the 100+ hatch pattern […]
AutoCAD Defpoints Tutorial
What are Defpoints in AutoCAD, and why is there a Defpoints layer in my AutoCAD drawing file?
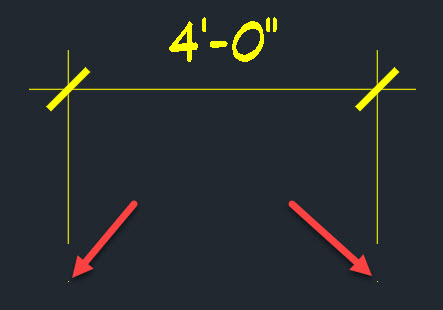
Defpoints, or Definition Points are point objects that are created when you select two origin points as you place a dimension in your drawing. See the AutoCAD 2018 screen capture below:

The two yellow points you see are the first and second points you picked to locate the dimension in your drawing. These points are used by AutoCAD when you are placing “Associative” dimensions in your drawing. Associative dimensions are a setting in AutoCAD that when turned on, will let you stretch, or scale an object, and the dimension text will be updated to the new size. An example is if I stretch a wall length from 10′-0″ to 15′-0″, the dimension text will now read 15′-0″ showing the new true length. So your dimensions are “associated” to the objects they are placed on. It is a “best practice” to always leave your associative dimensions setting turned on. It is also a “best practice” to create a separate layer for all your dimensions, I have always used a short name version and called my dimension layer “Dims”.
You may have noticed when you start a drawing from scratch that there is only 1 layer created, layer “0”. The Defpoints layer is not created until you place your first dimension in the drawing. AutoCAD creates the Defpoints layer automatically when the first dimension is placed. The dimension objects, dimension line, extension lines, ticks/arrows, and dimension text will all go on the current layer. But the defpoints points themselves will go on the newly created layer called Defpoints. The “Defpoints” layer has special properties, it is a “no plot” layer, so you can see the defpoints on your CAD drawing screen, but they will never plot. The color of the defpoints layer is determined by the current layer that you placed the dimension on. Once the defpoints layer is created by placing your first dimension, it cannot be deleted from your drawing file.
You can set the Defpoints layer current and draw, but none of the objects on the defpoints will plot/print.
TIP: Back in the day, we used to set the Defpoints layer current when we wanted to place design notes on the drawing that we didn’t want to show up on the prints. You can still use the defpoints layer for this in all the versions of AutoCAD from AutoCAD 2018 on back. In the later versions of AutoCAD you can now create any layer and set it to “No Plot” to place anything in a drawing that you don’t want printed.
I hope this post on AutoCAD Defpoints was helpful. The two points “defpoints” at the origins of all AutoCAD dimensions, and the Defpoints layer have always been kind of a mystery. I hope this AutoCAD tutorial was helpful. Please send me a note if you have any questions.
Click here to email Kevin a note.
-Kevin
AutoCAD Defpoints
AutoCAD Defpoints Tutorial What are Defpoints in AutoCAD, and why is there a Defpoints layer in my AutoCAD drawing file? Defpoints, or Definition Points are point objects that are created when you select two origin points as you place a dimension in your drawing. See the AutoCAD 2018 screen capture below: The two yellow points […]
The newest issue of AUGI World is now available online.

Click on the link below:
https://www.augi.com/augiworld/issue/july-2017
AUGI World July 2017 Issue Available
The newest issue of AUGI World is now available online. Click on the link below:https://www.augi.com/augiworld/issue/july-2017

Thank you to all our great customers in 2016!

